前言
前端工程师肯定相当不陌生状态管理,无论是 Vuex, Pinia,亦或是 Redux,Mobx 等,都很好的帮助我们实现了不同页面间的数据共享和状态管理。在 Tauri 应用中,前端的状态管理工具库任君选择,但后端的状态管理还是和它们有些区别的。
言归正传,Tauri 也提供了正式的状态管理功能,很神奇的是,在笔者一开始接触 Tauri 了解相关资料的时候还能在官网找到相关介绍,现在是完全没有了,只留下了一点零星描述 Accessing managed state ,当然,它并不复杂,下面让我们来看看如何使用状态管理。
State Management
相信大家都不陌生 todo list 这个功能,一般来说基本这是前端框架入门时必学的一部分,它其实很好地能表现状态管理这一功能,我们将尝试把整个 list 放在后端进行状态管理,前端将仅能负责 list 的操作和展示。
前端相信大家都很会写 todo list 了,这里就做个简陋的模板:
1
2
3
4
5
6
7
8
9
10
11
12
13
14
15
16
17
18
19
20
21
22
23
24
25
26
27
28
29
30
31
32
33
34
35
36
37
38
39
40
41
42
43
44
45
46
47
48
49
50
51
52
53
54
55
56
57
58
59
60
61
62
63
64
65
66
67
68
69
70
71
72
| // APP.vue
<template>
<div class="container">
<h1>Welcome to State Management!</h1>
<div class="input">
<input type="text" v-model="input_todo">
<button @click="add_todo_to_backend">Add</button>
</div>
<ul class="list">
<li
v-for="(todo, id) in todo_list.value"
:key="id"
>
<div class="content">
<span>{{todo}}</span>
<button
class="delete"
@click="delete_todo(id)"
>X</button>
</div>
</li>
</ul>
</div>
</template>
<script setup lang="ts">
import Greet from "./components/Greet.vue";
import { ref, reactive } from 'vue';
import { invoke } from '@tauri-apps/api/tauri'
const input_todo = ref('');
const todo_list = reactive({});
async function add_todo_to_backend() {
await invoke('add_todo', { data: input_todo.value })
.then((res) => {
todo_list.value = res;
})
}
async function delete_todo(_id: string) {
await invoke('delete_todo', { id: _id })
.then((res) => {
todo_list.value = res;
})
}
</script>
<style scoped>
.input {
display: flex;
justify-content: center;
}
.list {
display: flex;
flex-direction: column;
align-items: flex-start;
width: 50%;
margin-left: 26%;
}
.delete {
margin-left: 20px;
}
</style>
|
现在让我们来看看后端,首先我们将创建一个 TodoList 结构体来存放数据,每个 todo 都有一个唯一的 id 与之对应。
1
2
3
4
5
6
7
8
9
10
11
12
13
14
15
16
17
18
19
20
21
| use uuid::Uuid;
use serde::{Serialize, Deserialize};
use std::collections::HashMap
#[derive(Clone, Serialize, Deserialize)]
pub struct TodoList {
pub list: HashMap<String, String>
}
impl TodoList {
pub fn add(&mut self, data: &str) -> bool {
let id = Uuid::new_v4().to_string();
self.list.insert(id, data.to_string());
true
}
pub fn delete(&mut self, id: &str) -> bool {
self.list.remove(id).unwrap();
true
}
}
|
看上去十分简洁,功能一目了然。那现在如何将其纳入 Tauri 的状态管理呢,我们可以这样做。
1
2
3
4
5
6
7
8
9
10
11
12
13
14
15
16
17
18
19
20
21
22
23
24
25
26
27
28
29
30
31
32
33
34
35
36
37
38
39
|
use std::sync::Mutex
...
pub struct TodoListWrapper(pub Mutex<TodoList>);
fn main() {
let todo_list = TodoListWrapper(Mutex::new(TodoList {
list: HashMap::new()
}));
tauri::Builder::default()
.manage(todo_list)
.invoke_handler(tauri::generate_handler![
add_todo,
delete_todo
])
.run(tauri::generate_context!())
.expect("error while running tauri application");
}
fn main() {
tauri::Builder::default()
.setup(move |app| {
let todo_list = TodoListWrapper(Mutex::new(TodoList {
list: HashMap::new()
}));
app.manage(todo_list);
Ok(())
})
.invoke_handler(tauri::generate_handler![
add_todo,
delete_todo
])
.run(tauri::generate_context!())
.expect("error while running tauri application");
}
|
理论上现在我们就可以顺利访问 todo_list 结构体了,还记得前面说过的前后端通信吗?让我们最后再加上一点细节。
1
2
3
4
5
6
7
8
9
10
11
12
13
14
15
16
17
18
19
20
21
22
23
| #[tauri::command]
fn add_todo(data: String, state: tauri::State<TodoListWrapper>) -> HashMap<String, String> {
let res = state.0.lock().unwrap().add(&data);
if !res {
println!("Failed to add todo to list");
}
let current_list = state.0.lock().unwrap().list.clone();
current_list
}
#[tauri::command]
fn delete_todo(id: String, state: tauri::State<TodoListWrapper>) -> HashMap<String, String> {
let res = state.0.lock().unwrap().delete(&id);
if !res {
println!("Failed to add todo to list");
}
let current_list = state.0.lock().unwrap().list.clone();
current_list
}
|
现在程序就能正常跑啦,只要再配合本地文件的读写就能实现数据的保存和使用,这部分我们留到下一章 app 基建来讲述。

Event 的主动发送
还记得上一张我们提到的有关后端主动发送 event 的 “自由” 吗?相信看了本章内容的你应该大致已经能猜到到底应该怎样实现后端主动发信了,简单来说就是把 app_handle 或 window 这样的具备 emit 功能的结构体一起放进状态管理,那现在就让我们来实现简单的心跳包功能吧。
首先我们需要引入一个新的第三方库 tokio_cron_scheduler, 它将负责定期发送心跳信息,我们可以这样初始化它:
1
2
3
4
5
6
7
| pub async fn initialize_cron_scheduler() -> JobScheduler {
let cron_handler = JobScheduler::new().await.expect("Failed to initialize tokio cron handler");
cron_handler.start().await.expect("Failed to start tokio cron handler");
cron_handler.clone()
}
|
然后我们向之前的结构体添加 cron handler 及相关心跳程序。
1
2
3
4
5
6
7
8
9
10
11
12
13
14
15
16
17
18
19
20
21
22
23
24
25
26
27
28
29
30
31
32
| pub struct TodoList {
pub list: HashMap<String, String>,
pub app_handler: AppHandle,
pub cron_handler: JobScheduler,
}
impl TodoList {
pub fn add(&mut self, data: &str) -> bool {
let id = Uuid::new_v4().to_string();
self.list.insert(id, data.to_string());
true
}
pub fn delete(&mut self, id: &str) -> bool {
self.list.remove(id).unwrap();
true
}
pub async fn start_sending_heart_rate(&mut self) {
let callback_app_handle = self.app_handler.clone();
println!("start cron job");
let heart_job = Job::new("0/2 * * * * *", move |_uuid, _l| {
println!("I run every 2 seconds");
let _ = &callback_app_handle.emit_all("heart", "tauri works well");
}).unwrap();
let job_id = self.cron_handler.add(heart_job).await.unwrap();
println!("Heart job id {}", job_id);
}
}
|
接着我们重新对结构体进行状态管理的初始化并添加前端交互的 command。
1
2
3
4
5
6
7
8
9
10
11
12
13
14
15
16
17
18
19
20
21
22
23
24
25
26
27
28
29
30
31
32
| #[tauri::command]
fn start_heart_rate(state: tauri::State<TodoListWrapper>) -> Result<(), ()> {
println!("get command");
block_on(state.0.lock().unwrap().start_sending_heart_rate());
Ok(())
}
fn main() {
tauri::Builder::default()
.setup(move |app| {
let handle = app.handle();
let cron = block_on(initialize_cron_scheduler());
let todo_list = TodoListWrapper(Mutex::new(TodoList {
list: HashMap::new(),
app_handler: handle,
cron_handler: cron
}));
app.manage(todo_list);
Ok(())
})
.invoke_handler(tauri::generate_handler![
add_todo,
delete_todo,
start_heart_rate
])
.run(tauri::generate_context!())
.expect("error while running tauri application");
}
|
最后我们在前端添加心跳相关启动按钮和消息接受功能。
1
2
3
4
5
6
7
8
9
10
11
12
13
14
15
16
17
18
19
20
21
22
23
24
25
26
27
28
29
30
31
32
33
34
35
36
37
38
39
40
41
42
43
44
45
46
47
48
49
50
51
52
53
54
55
56
57
58
59
60
61
62
63
64
65
66
67
68
69
70
71
72
73
74
75
76
77
78
79
80
81
82
83
84
85
86
87
88
89
90
91
| // APP.vue
<template>
<div class="container">
<h1>Welcome to State Management!</h1>
<div class="input">
<input type="text" v-model="input_todo">
<button @click="add_todo_to_backend">Add</button>
<button @click="start_heart_rate">Heart</button>
</div>
<ul class="list">
<li
v-for="(todo, id) in todo_list.value"
:key="id"
>
<div class="content">
<span>{{todo}}</span>
<button
class="delete"
@click="delete_todo(id)"
>X</button>
</div>
</li>
</ul>
</div>
</template>
<script setup lang="ts">
import Greet from "./components/Greet.vue";
import { ref, reactive, onMounted } from 'vue';
import { invoke } from '@tauri-apps/api/tauri';
import { emit, listen } from '@tauri-apps/api/event';
const input_todo = ref('');
const todo_list = reactive({});
const isHeartStart = ref(false);
async function add_todo_to_backend() {
await invoke('add_todo', { data: input_todo.value })
.then((res) => {
todo_list.value = res;
})
}
async function delete_todo(_id: string) {
await invoke('delete_todo', { id: _id })
.then((res) => {
todo_list.value = res;
})
}
async function start_heart_rate() {
await invoke('start_heart_rate');
}
async function listen_to_heart_rate() {
const unlisten = await listen('heart', (event: any) => {
// event.payload 才是实际的结构体
console.log(event.payload);
});
}
onMounted(() => {
listen_to_heart_rate();
})
</script>
<style scoped>
.input {
display: flex;
justify-content: center;
}
.list {
display: flex;
flex-direction: column;
align-items: flex-start;
width: 50%;
margin-left: 26%;
}
.delete {
margin-left: 20px;
}
</style>
|
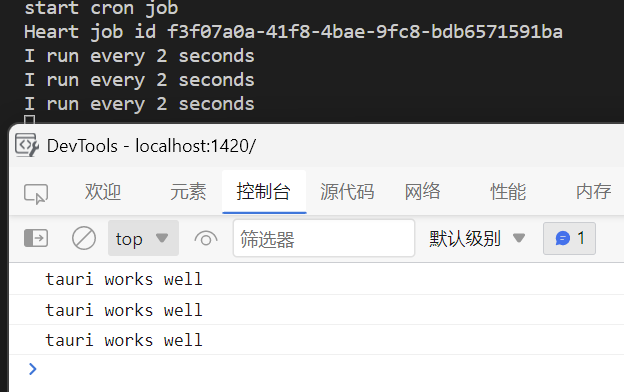
现在当我们点击 Heart 按钮时就可以看到心跳功能正常运行中。